I have been researching alternative gardening methods and have come to the conclusion that we will be trying something new with our raised garden beds.
Hugelkultur (Heeg-al kul-tur) is a gardening method that has been used in Germany and parts of Europe for many centuries. The method is making raised garden beds by piling dead, dry and rotten wood then covering it with mulch, compost and dirt. The wood absorbs and retains moisture (from snow, rain and watering) then slowly releases it over time. The wood deteriorates and breaks down into organic matter while releasing nutrients into the soil.
At our 1/4 acre suburban homestead we often have a shortage of rain in the summer. We live on top of a large plateau with many hot and windy summer days. Our garden yields are often challenged by lack of moisture, sun, heat and wind. When it does rain the moisture rarely lasts very long. Hugelkulture is our answer to water retention and soil moisture in our garden beds.
How to Make Hugelkultur Raised Garden Beds:
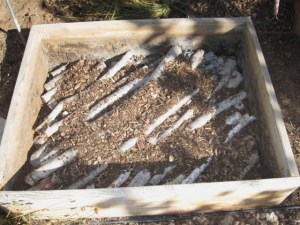
First we removed all of the soil in our raised bed frame. Next we filled the bottom three inches with dried tree branches. We were fortunate to have had access to tree branch trimmings. 
Once the wood logs were in place we shoveled bark, compost and dried leaves over them.
Finally, we finished off the beds by filling them with a rich organic soil / compost mix.
Note: Within a year or two as the wood begins decomposing the soil temperature will heat up a couple of degrees (similar to a working compost pile). This extra soil heat allows extended growing season opportunities.
Hugelkultur – It’s fun to say! – Jabbear

That sounds like a great idea. Never heard of it before.
What a great idea – we will be making more raised beds next spring. I can’t wait to try this!
I don’t know about any plans, but I built some elevated beds by tikang a piece of 5/8 treated plywood and building a stand for it out of 4 4 s. The stand has to be pretty stout, it will be holding a lot of weight. Build the frame first then set it on the legs, It has six legs. I have a full frame around the outside with two cross pieces evenly spaced from end to end. I cut sides and ends out of another piece of plywood 16 tall and then attached them to the floor by running a 2 2 around the edge , set back far enough so that the outside of the sides and ends are even with the edge of the floor. I ran another wall across four feet from each end and stiffened that with 2 4 s. I used screws throughout that are rated for use in treated lumber.I have three of the beds that are three years old and still going great. Don’t forget to drill holes in the floor for drainage.
Fabio, Thank you for sharing your plans for your elevated garden bed. We built elevated garden beds when we lived in the city. We did it to keep the dogs out of our veggies. We enjoyed the ease of gardening that summer – Never having to bend over while weeding or harvesting.
This looks like something I am going to try out at my sister’s place. I was going attempt a “lasanga garden” but htis might be better. Also to reduce moisture loss & keep the weeds down I have been putting straw – not hay – betwwen the plants. Plus it helps keep the mud off your shoes when you are in the garden.
[…] Our Hugelkultur post a few months back really generated a lot of interest. Here are a couple of photos we did not include in that post. see Hugelkultur […]
Excellent idea! I can’t wait to hear how this turns out for you. Looking forward to more updates on this subject.
Thank you for your comment.
We are very excited about this project and will be posting updates along the way.
I had mine built with 2 6 but I had them made 4ft x 6ft. I have used them now for 5 years and love gardening this way. I have more coonrtl over the weeds and I don’t seem to get as many pests. But my favorite part about these beds is the fact that I can actually plant at least one month before everyone else does because if I watch the weather report I know if I need to go out and cover the beds with plastic over night. These beds protect your seedlings from the wind too. I keep sheets of plastic like a paint drop cloth rolled up at the end of each bed if I need to cover I just pull the plastic over the bed and secure it with dirt or rocks. I doubt I will ever garden any other way again.Hope this helps. Enjoy
Josiane – Thank you for the great comments. I too believe that Hugelkultur raised garden beds are the best way for “Downsized” gardening.
I love your blog keep up the good work
Thank you for your kind comment. Follow us at HOMESTEADING Downsized -Baby Steps to Life’s Independence – and tell your friends to follow us as well.
I enjoyed reading this, i’ve been wondering about this subject for a while. Anunturi Romania
Thank you for your comment. Hugelkultur raised garden beds is the way to go with gardening. Once They are built they need little maintenance.